Light it up
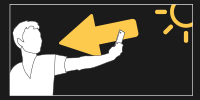
The most important element in getting the perfect shot is light. When your taking a shot selfie style, try to position yourself so the main source of light is directed at you.
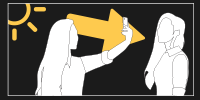
On the other hand, if you’re taking a shot of a friend, make sure the source of light is directed at them.
If too much light is getting into your scene, try repositioning your friend or yourself in a more ideal spot. If you’re shooting outdoors, try moving to a spot with more shade. If you are shooting indoors, simply reposition the camera angle or your subject to more closely match the light in the selected scene.
Light Sources
Fazemask scenes have a wide variety of settings and light sources. Try to match your light source when shooting with that of the scenario.
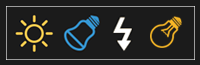
For instance, if it appears that your selected scene was shot in sunlight, try to match up the shot by shooting outside. If the shot could use a little more contrast, you can turn on the built in flash (may only be available when using the back camera on your device). Even when there is ample light from the sun, using the flash for your shot can supply additional fill light to balance the scene.

If the scene appears to have been shot in a studio or indoor setting with a cooler light source, consider shooting indoors with LED light or use the flash. Some scenarios may even look best when using flash in conjunction with a LED light source.

Some indoor and studio scenes will have a warmer light cast. For these situations, consider shooting with a traditional incandescent light source. Again, flash can also be used for more control over the scene.

Fine Tune the Light
Does your selected scene have hard shadows in certain spots? Try using a piece of construction paper or cardboard to create your own unique shadowing by blocking the light in specific spots on your subject.
Sometimes the scene will have a more difused light cast. You can mimic this appearance by using a translucent substrate like tracing paper to filter your light source.
Enhance the Subject
Supplement your creations with makeup or other cosmetic accessories to get the most out of your shots.
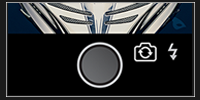
Interface
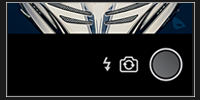
The shutter button is located directly center below the camera view. Use this button to snap your shot once you have it composed the way you like. To the immediate right of the shutter button is the switch camera button. To the right of that is the flash toggle on/off button. Note that your device might only offer flash when shooting with the back camera.
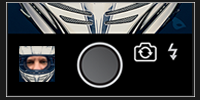
Once you snap your shot, the shutter button will change into a save button. If you are satisfied with the image shown on the screen, you can push this button to save the image to your photo library.

After you hit the save button a small thumbnail view of your shot will appear on the bottom left of the screen. You can touch this to directly access several sharing options. Here you can message, email, tweet or share your image on Facebook.
For larger devices like tablets, the shutter button will be on the bottom right to allow for easier shooting.